
How to Replace a Broken Tile: A DIY Guide
Tiles are a durable and attractive option for flooring and walls in homes. However, accidents happen, and tiles can break. Whether it’s a hairline crack or a shattered piece, a broken tile can mar the beauty of your surface and potentially lead to further damage. Fortunately, replacing a broken tile is a manageable DIY task. This comprehensive guide will walk you through the process step by step. Expect to spend a few hours from start to finish, depending on your skill level and the project’s complexity.
Materials and Tools Required
Before you begin, gather all the necessary materials and tools. You’ll need:
- Replacement tile
- Thin-set or Tile adhesive
- Pre-mixed grout (or grout mix)
- Grout float
- Notched trowel
- Hammer
- Chisel
- Safety glasses
- Gloves
- Sponge
- Cloth
- Bucket of water
- Anti-fracture paint like RedGuard
Ensure the replacement tile matches your existing tiles in size, color, and thickness.
Safety Precautions
Safety should be your top priority. Wear safety glasses to protect your eyes from flying debris and gloves to shield your hands during the removal and installation process.
Identifying the Broken Tile(s)
Start by inspecting the area and identifying which tiles need replacement. Tiles can break due to heavy impact, sharp objects, or structural issues like a weak substrate. Understanding the cause can help prevent future breakage.
Also hit around with your knokles or a coin to see if other unbroken tiles are lose.
Selecting the tile replacment
Really make sure that the new tile matches not only in color (the obvious one) in size, and thickness. You do not want to get a replacement tile that is not a good match for your existing ones because it is likely to become a spot of bother for you in the long term.
The color tone is an important one, many tiles have different shades that look the same but after installation they may look a tinny bit brighter or darker and ruin the whole room.
Removing the Broken Tile
- Prepare the Area: Clear the area of any movable objects and cover adjacent surfaces to protect them from debris.
- Remove Grout: Use a grout saw or a chisel to carefully remove the grout around the broken tile. Be gentle to avoid damaging adjacent tiles.
- Break the Tile: If the tile isn’t already shattered, cover it with a cloth and gently tap it with a hammer to break it into smaller pieces.
- Remove Tile Pieces: Use a chisel to pry out the pieces of the tile. Start from the center and work your way out.
- Clean the Space: Once all the tile pieces are removed, clean the area thoroughly to remove any thin-set, adhesive and debris. More about this in the next step.
Preparing the Surface
After removing the broken tile, it’s essential to prepare the surface for the new tile:
- Remove Old Adhesive: Scrape off any old adhesive from the substrate. I mean any thin-set, any leftover can cause lippage and also make the break in that area.
- Level the Surface: Ensure the surface is level and clean. If necessary, apply a thin layer of thinset mortar to level it out.
- Dry Fit the Tile: Place the new tile in the empty space to ensure it fits perfectly.
- Apply Anti-fracture: RedGuard or Anti-fracture paint will prevent future cracks.
Mortar Thin-set
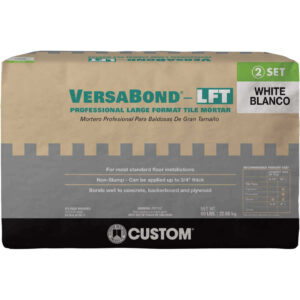 If you are using mortar instead of tile adhesive, you can purchase at any home improvement store. For example in HomeDepot they have the brand Custom Versabon fortify thin-set white. I recommend white because it is easier to clean.
Preparing the Mortar Thin-set
Installing the New Tiles
- Apply Thin-set: Spread the thin-set or tile adhesive on the back of the new tile using a notched trowel.
- Place the Tile: Carefully set the tile into place, pressing it firmly to ensure good contact with the adhesive.
- Alignment: Make sure the tile is aligned with the surrounding tiles. Adjust as needed before the adhesive sets.
- Let it Settle: Allow the adhesive to dry according to the manufacturer’s instructions. I recommend at least 24 hours.
Note: clean any excess mortar in the edges using the Notched trowel. This will allow better grout installation.
Grouting the Tile
Once the adhesive has set, it’s time to grout:
- Mix Grout: If you’re using grout mix, prepare it according to the instructions.
- Like the mortar you don’t want the grout too soft nor too hard.
- Apply Grout: Use a grout float to apply grout into the spaces between the tiles.
- Clean Excess Grout: Wipe away excess grout with a damp sponge. Do a few different passages.
- Curing: Allow the grout to cure as per the product guidelines.
Cleaning and Maintenance
After the grout has cured, clean the tile surface with a damp cloth. Regular cleaning and maintenance can extend the life of your tiles and prevent future damage. Avoid using harsh chemicals that can erode the grout.
Troubleshooting Common Issues
During tile replacement, you might encounter issues like uneven tiles or grout color mismatch. These can often be corrected by carefully re-leveling the tiles or using a grout colorant.
How do I make sure that the replacement tile won’t crack again?
Ensuring that your replacement tile won’t crack again involves several key steps during both the selection and installation processes:
- Choose High-Quality Tiles:
- Opt for tiles that are known for their durability. Porcelain tiles, for example, are harder and denser than ceramic tiles, making them more resistant to cracking.
- Proper Subfloor Preparation:
- Ensure that the subfloor is level, clean, and stable. Any flex or movement in the subfloor can cause tiles to crack. Use a self-leveling compound if necessary to even out any irregularities.
- Use the Right Adhesive:
- Select a high-quality thinset mortar suitable for the type of tile you are installing. Follow the manufacturer’s instructions for mixing and applying it.
- Correct Tile Installation:
- Lay the tiles carefully, ensuring they are evenly spaced and level. Avoid air pockets under the tiles by pressing them firmly into the adhesive.
- Proper Grouting:
- Fill the gaps between the tiles with a suitable grout. Make sure the grout is applied evenly and is allowed to cure as per the manufacturer’s instructions.
- Adequate Curing Time:
- Allow the adhesive and grout to cure fully before walking on the floor. This can take several days depending on the products used.
- Expansion Joints:
- Install expansion joints in large tiled areas to allow for natural expansion and contraction of the tiles, which can prevent cracking.
- Regular Maintenance:
- Keep the tile surface clean and free of debris that can cause scratches or cracks. Attend to any spills promptly to prevent stains.
- Avoid Heavy Impact:
- Be mindful of dropping heavy objects on the tile, as this can lead to cracking.
By taking these precautions, you can significantly reduce the risk of your replacement tile cracking in the future.
Other Broken Tile Replacement Considerations
What are the best materials for tile floor replacement?
- Porcelain tiles are highly durable and resistant to moisture, making them ideal for high-traffic areas. You should use it in high traffic areas like entry halls and kitchens.
- Ceramic tiles are versatile and cost-effective, suitable for various indoor settings like walls.
- Natural stone tiles like marble, granite, or slate provide a unique, high-end look but can be more expensive and require more maintenance and you need a wet saw to cut the tile.
- Vinyl tiles are budget-friendly and come in various designs, including ones that mimic natural stone or hardwood.
Is it possible to replace just one Broken Floor Tile?
Absolutely, it is possible to replace just one broken floor tile. Just be extra careful removing the tile. This process involves carefully removing the broken tile, and the rest is exactly the same cleaning the area, applying a new adhesive, and then placing a new tile that matches the existing one(s).
Replacement Tile – Where can I find tiles to match my existing floor?
This is the bad news, if you havean old tile it may be discontinue. You will have to go to a few different stores. Check your attic for an old tile box, that will help with the brand and makes things easier. You can find matching tiles at home improvement stores, specialty tile stores, or online retailers.
It’s helpful to bring a sample. A picture can help but is harder to get the color and tone from a picture.
If the exact tile is discontinued, look for something similar in size, color, and texture.
What are the advantages of using a ceramic tile floor?
- Durability: Ceramic tiles are tough, slim and ideal for walls and less traffic area.
- Low Maintenance: They are easy to clean and resist stains, scratches, and fading.
- Water Resistance: Ceramic tiles are ideal for wet areas like bathrooms and kitchens.
- Cost-Effective: Generally more affordable than porcelain or natural stone.
- Variety: Available in an extensive range of colors, patterns, and sizes.
- Hypoallergenic: They don’t harbor dust or allergens, making them a good choice for allergy sufferers.
Conclusion
Replacing a broken tile is a satisfying DIY project that can save you the cost of calling in a professional for one broken floor tile. Should you deal with a bigger project covering a higher square footage, an entire tile floor replacement or an entire damaged area in your house we suggest you get professional help!
Here’s a checklist to help you decide whether to DIY or hire a professional to install replacement tiles:
When to DIY
- Skill Level: You have basic DIY skills and experience with similar projects.
- Project Size: The area to be tiled is small and manageable, like a bathroom floor or kitchen backsplash.
- Tile Type: You’re using standard ceramic or vinyl tiles, which are easier to handle.
- Tools Availability: You have access to or are willing to invest in the necessary tools (tile cutter, notched trowel, level, etc.).
- Time Availability: You have enough time to dedicate to the project, including preparation and cleanup.
- Complexity: The job doesn’t require complex patterns or cuts.
- Budget Constraints: You’re looking to save money on labor costs.
When to Hire a Professional
- Lack of Experience: You have limited or no experience in tile installation.
- Large or Complex Area: The project involves a large area or complex patterns that require precise cutting and placement.
- High-End Tiles: You’re working with expensive materials like natural stone, where mistakes can be costly.
- Subfloor Issues: The subfloor needs significant preparation or repair.
- Time Constraints: You need the job done quickly and efficiently.
- Perfection Desired: You want a guaranteed professional finish, especially in high-visibility areas.
- Heavy Tiles: You’re using large, heavy tiles that are difficult to install evenly without experience.
- Special Features: The project involves additional complexities like in-floor heating systems or waterproofing in wet areas.
Remember, while DIY can be rewarding and cost-effective for simple projects, professional installation ensures expertise, efficiency, and often comes with a warranty for the work done. Evaluate your situation against these points to make the best decision for your tile installation project.